To clone this repository simply run the command "git clone https://github.com/MikeGriffinReborn/AzureOAuthSwaggerReDoc.git"
The Visual Studio Project
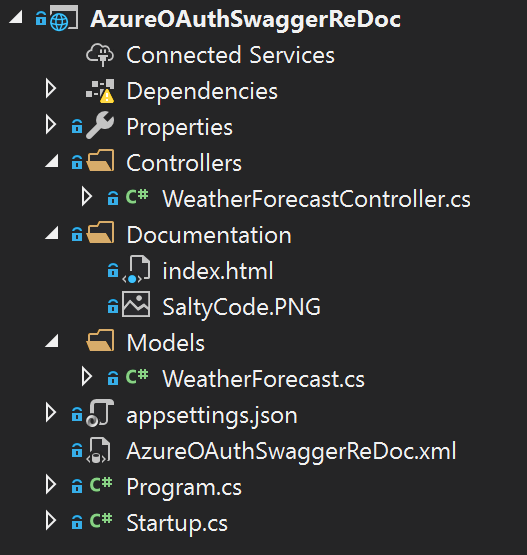
Notice how simple the Visual Studio project is. We have our Controller, the Model class returned by the Controller, the Documentation folder used for ReDoc, and the Startup.cs class where most of the real work is done.
Lets start with Swagger
Swagger is pretty easy to plug in. Getting it to authenticate with oAuth is a different story however and can be frustrating. However, I show you later on in this blog post how to do exactly that. Setting up swagger requires adding some NuGet Packages. Since this example uses .NET Core 3.1 I used the latest release candidates of Swashbuckle, the 5.0.0-rc5 versions.
<PackageReference Include="Swashbuckle.AspNetCore.Swagger" Version="5.0.0-rc5" />
<PackageReference Include="Swashbuckle.AspNetCore.SwaggerGen" Version="5.0.0-rc5" />
<PackageReference Include="Swashbuckle.AspNetCore.SwaggerUI" Version="5.0.0-rc5" />
public void ConfigureServices(IServiceCollection services)
{
    services.AddSwaggerGen(c =>
    {
        c.SwaggerDoc("v1", new OpenApiInfo
        {
            Title = "Azure/oAuth/Swagger/ReDoc/.NET Core 3.1 Api v1",
            Version = "v1",
        });
    }
}

public void Configure(IApplicationBuilder app, IWebHostEnvironment env)
{
    app.UseSwagger();
    app.UseSwaggerUI(c =>
    {
        c.SwaggerEndpoint("/swagger/v1/swagger.json",
            "Azure/oAuth/Swagger/ReDoc/.NET Core 3.1 Api v1");
    });
}

Let's add Azure oAuth Support to our Swagger API
Below contains the additional code added to support oAuth in Swagger. In order to run this you will need to add your Azure Tentant ID and an Azure App Registration's Client ID to the appsettings.json file. There are plenty of articles describing how to setup and obtain this information. The important thing here is that you will need to add "Redirect URI" in your Azure App Registration's "Authentication" blade to make this work. The value I added was https://localhost:44326/swagger/oauth2-redirect.html but if your "port" is different for some reason be sure to use your solutions port.public void ConfigureServices(IServiceCollection services)
{
services.AddAuthentication(options =>
{
options.DefaultScheme = JwtBearerDefaults.AuthenticationScheme;
options.DefaultAuthenticateScheme = JwtBearerDefaults.AuthenticationScheme;
options.DefaultChallengeScheme = JwtBearerDefaults.AuthenticationScheme;
});
services.AddAuthentication(JwtBearerDefaults.AuthenticationScheme)
.AddJwtBearer(options =>
{
options.Audience = oAuthAudience;
options.Authority = $"https://sts.windows.net/{AzureTenant}/";
//options.RequireHttpsMetadata = true;
})
.AddJwtBearer("oauth2", options =>
{
options.Audience = oAuthAudience;
options.Authority = $"https://sts.windows.net/{AzureTenant}/";
//options.RequireHttpsMetadata = true;
});
services.AddSwaggerGen(c =>
{
c.AddSecurityDefinition("oauth2", new OpenApiSecurityScheme
{
Type = SecuritySchemeType.OAuth2,
In = ParameterLocation.Header,
Scheme = "bearer",
Flows = new OpenApiOAuthFlows
{
Implicit = new OpenApiOAuthFlow
{
AuthorizationUrl =
new Uri($"https://login.microsoftonline.com/{AzureTenant}/oauth2/authorize"),
TokenUrl =
new Uri($"https://login.microsoftonline.com/{AzureTenant}/oauth2/token"),
Scopes = new Dictionary
{
{ "readAccess", "Access read operations" },
{ "writeAccess", "Access write operations" }
}
}
}
});
c.AddSecurityRequirement(new OpenApiSecurityRequirement {
{
new OpenApiSecurityScheme {
Reference = new OpenApiReference {
Id = "oauth2", //The name of the previously defined security scheme.
Type = ReferenceType.SecurityScheme
}
},
new List()
}
});
});
}
public void Configure(IApplicationBuilder app, IWebHostEnvironment env)
{
app.UseSwaggerUI(c =>
{
c.SwaggerEndpoint("/swagger/v1/swagger.json", "Azure/oAuth/Swagger/ReDoc/.NET Core 3.1 Api v1");
// The two lines below were added ...
c.OAuthClientId(oAuthAudience);
c.OAuthAdditionalQueryStringParams(new Dictionary() { { "resource", oAuthAudience } });
});
}
Notice the "Authorize" Button is now displayed. The authorize button will popup and ask you to login with your Azure Login and return a valid oAuth token to the Swagger API. If you look at the code above I have set it up so that the JWT token is passed in the Authorize HTML Header as a Bearer Token.

Let's round this out by adding the [Authorize] attribute on our controller method.
[Authorize]
public IEnumerable Get()
{
    var rng = new Random();
    return Enumerable.Range(1, 5).Select(index => new WeatherForecast
    {
        Date = DateTime.Now.AddDays(index),
        TemperatureC = rng.Next(-20, 55),
        Summary = Summaries[rng.Next(Summaries.Length)]
    })
    .ToArray();
}
Our REST API is now secured via an oAuth token that can only come from our Azure tenant. At this point you can use a "Machine-to-Machine" clientid/clientsecret to give 3rd parties access or run internally using a Managed Service Identity to authenticate and obtain the token eliminating the need for clientid/clientsecret. It's best to hide any client secrets in the Azure Key Vault and never check them into source code, including the appsettings.json file.
Fully Documented Swagger
Finally, let's decorate out Swagger so that is fully documented for the consumer. We want all of our methods and properties to have descriptions that will convey important information to those consuming our REST API. You can annotate your methods and properties in the usual way shown as below and have those comments carry over into Swagger.public class WeatherForecast
{
/// <summary>
/// Date of Forecast
/// </summary>
public DateTime Date { get; set; }
/// <summary>
/// Temperature in Celsius
/// </summary>
public int TemperatureC { get; set; }
/// <summary>
/// Temperature in Fahrenheit
/// </summary>
public int TemperatureF => 32 + (int)(TemperatureC / 0.5556);
/// <summary>
/// The Forecast
/// </summary>
public string Summary { get; set; }
}
And you can decorate your controller methods with Swagger[] attributes as well ...
/// <summary>
/// Gets the Current Weather
/// </summary>
[HttpGet()]
[Route("GetForecast")]
[Produces("application/json")]
[SwaggerOperation("Gets the Current Weather")]
[SwaggerResponse((int)HttpStatusCode.OK, Type = typeof(WeatherForecast[]))]
[Authorize]
public IEnumerable<WeatherForecast> Get()
{
     // logic here
}
To make this work you need to turn on Visual Studio's ability to generate an XML Documentation file. NOTE: You need to do this for both Release and Debug mode. I used my assembly name as the XML file name and that works nicely when combined with the code below..

Finally, add this logic to your ConfigureServices method within the AddSwaggerGen() call to let Swagger know to use your documentation file.
public void ConfigureServices(IServiceCollection services)
{
    services.AddSwaggerGen(c =>
    {
        // Set the comments path for the Swagger JSON and UI.
        var xmlFile = $"{Assembly.GetExecutingAssembly().GetName().Name}.xml";
        var xmlPath = Path.Combine(AppContext.BaseDirectory, xmlFile);
        c.IncludeXmlComments(xmlPath);
    });
}
ReDoc Support
ReDoc is great for OpenAPI/Swagger-generated API Reference Documentation and terribly simple to add to your project. All it takes is adding a very simple HTML file (or tag) to your solution. Notice how I use a relative path to my projects swagger.json file in the "redoc" html tag. This HTML file barely scratches the surface. The idea is you build out a fully documented site describing your REST API. You could include things like field lengths, validation rules, what's required on a POST to create an entity vs the fields required on a PUT to update an object and so on.<!DOCTYPE html>
<html>
<head>
<title>ReDoc</title>
<!-- needed for adaptive design -->
<meta charset="utf-8" />
<meta name="viewport" content="width=device-width, initial-scale=1">
<link href="https://fonts.googleapis.com/css?family=Montserrat:300,400,700|Roboto:300,400,700"
rel="stylesheet">
<style>
body {
margin: 0;
padding: 0;
}
</style>
</head>
<body>
<redoc spec-url='/swagger/v1/swagger.json'></redoc>
<script src="https://cdn.jsdelivr.net/npm/redoc@next/bundles/redoc.standalone.js"></script>
</body>
</html>
But how do we serve up the HTML files? Remember, this is a Web API project not an ASP.NET Web App solution and is not made for serving up static html files. For this we will map our physical "Documentation" folder (see the first image in this blog post) in our Visual Studio solution to the logic path "\Documentation". Note that our physical folder could have been named anything. WE could have stated to use "index.html" as the default file in the call to app.UseDefaultFiles() but that is already the default. Our ReDoc tag is in our Index.html file.
public void Configure(IApplicationBuilder app, IWebHostEnvironment env)
{
    //------------------------------------------------------
    // BEGIN : Serve up Files for ReDoc
    //------------------------------------------------------
    PhysicalFileProvider fileprovider =
       new PhysicalFileProvider(Path.Combine(env.ContentRootPath, "Documentation"));

    app.UseDefaultFiles(new DefaultFilesOptions
    {
        FileProvider = fileprovider,
        RequestPath = new PathString("/Documentation"),
    });

    app.UseStaticFiles(new StaticFileOptions
    {
        FileProvider = fileprovider,
        RequestPath = new PathString("/Documentation"),
    });

    app.UseFileServer(new FileServerOptions()
    {
        FileProvider = fileprovider,
        RequestPath = new PathString("/Documentation"),
        EnableDirectoryBrowsing = false
    });
    //------------------------------------------------------
    // END : Serve up Files for ReDoc
    //------------------------------------------------------
}
So now we can hit our logical documentation path https://localhost:44326/documentation/ and display our ReDoc UI. Notice that we don't have to include index.html in our path because it looks for that file name by default.

The ReDoc UI provides a much more sophisticated UI than does Swagger. However, ReDoc currently doesn't allow you to execute the API. That's fine however, because the two aren't really competing technologies. You want both Swagger and Redoc. If you look closely at the image above you'll notice I included an image from this blog as the Logo for our ReDoc site. How this this done? Keep reading ...
Adding a Logo to your ReDoc page
The code below shows how we use the Extensions feature to indicate we want to use a custom logo for ReDoc. Notice that we use a relative path to the saltycode.png file contained in our solution (first image in this post).public void ConfigureServices(IServiceCollection services)
{
services.AddSwaggerGen(c =>
{
c.SwaggerDoc("v1", new OpenApiInfo
{
Title = "Azure/oAuth/Swagger/ReDoc/.NET Core 3.1 Api v1",
Version = "v1",
// This adds the logo for ReDoc
Extensions = new Dictionary<string, IOpenApiExtension>
{
{
"x-logo", new OpenApiObject
{
{"url", new OpenApiString("/documentation/saltycode.png")},
{"altText", new OpenApiString("The Logo")}
}
}
}
});
});
}
That's was a lot of information but the code is really quite simple. I hope this saves you some time ...
Thank you very much for this guide. Helped me a lot :)
ReplyDeleteInitial You got a awesome blog .I determination be involved in plus uniform minutes. i view you got truly very functional matters , i determination be always checking your blog blesss. check this out
ReplyDelete